The following steps detail how to make a sitemap.xml using MySource Matrix that is compatible with search engines such as Google.
The process involves creating a design and asset listing page.
Please note that if your website contains a lot of pages the asset listing process may be resource intensive and may take a few seconds to load.
Step 1: creating the design
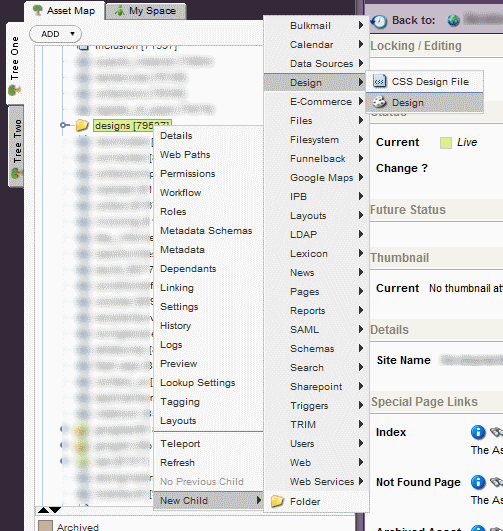
- Right-click on where you want to create the design, choose ‘New Child’ -> ‘Design’ then ‘Design’
- Under ‘Design Name’ enter Sitemap and click ‘Apply’ (you may choose another name)
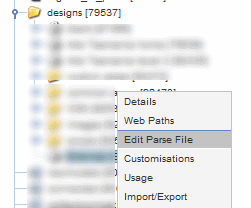
- Right-click on the sitemap design and choose ‘Edit Parse File’
- Acquire the lock and paste in the following code
-
<MySource_PRINT id_name="__global__" var="content_type" content_type="text/xml" />
<?xml version="1.0" encoding="UTF-8"?>
<urlset xmlns="http://www.sitemaps.org/schemas/sitemap/0.9">
<MySource_area id_name="body" design_area="body" /></urlset>
- Apply the changes.
- Open the ‘Details’ screen for the design and ‘Approve and Make Live’.
Step 1: creating the assist listing
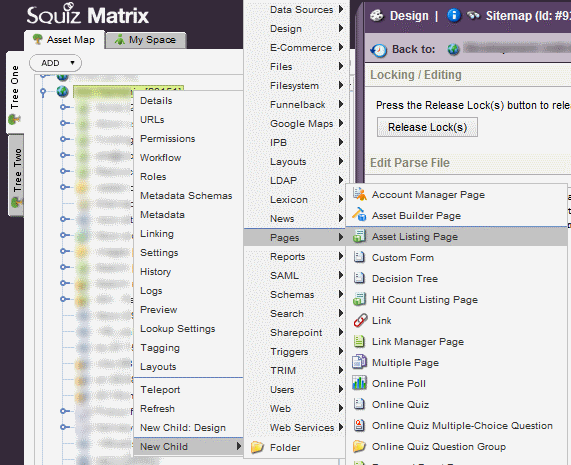
- At the top level of your website, right-click and choose ‘New Child’ -> ‘Pages’ then ‘Asset Listing Page’
- Under ‘Page Name’ enter sitemap.xml – it is important that this is the name entered, this is the recognised standard name for a website sitemap.
- Click ‘Apply’ to create the asset listing.
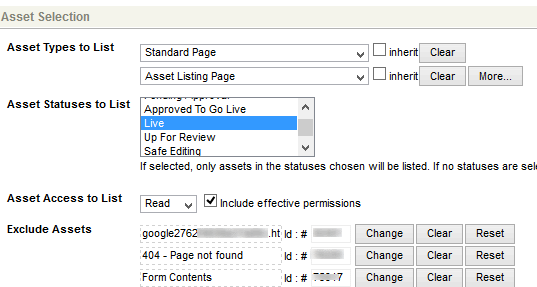
- Open the ‘Details’ screen, acquire the lock and choose what types of files and pages you want to be included, for example ‘Standard Page’ and ‘Assist Listing Page’
- Under ‘Asset Statuses to List’ choose ‘Live’
- Under ‘Exclude This Asset’ choose ‘Yes’
- Under ‘Root Nodes’ choose the top level of your website.
- From here you may also choose assets to exclude
- Apply the changes
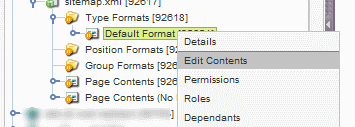
- Expand sitemap.xml, and then expand ‘Type Formats’
- Right-click on ‘Default Format’ and choose ‘Edit Contents’
- Click on the orange edit properties icon then change ‘Presentation’ and ‘Content Type’ to ‘Raw HTML’
- Click ‘Apply’
- Replace the content with the code below
-
<url>
<loc>%asset_url%</loc>
<lastmod>%asset_updated_short%</lastmod>
</url>
- Click ‘Apply’ to save the changes
- Right-click on ‘Page Contents’ and choose ‘Edit Contents’
- Click on the orange edit properties icon then change ‘Presentation’ and ‘Content Type’ to ‘Raw HTML’
- Click ‘Apply’
- Open the ‘Details’ screen for the design and ‘Approve and Make Live’.
Step 3: Apply the design to the asset listing page
- Right-click on the sitemap.xml asset listing page and select ‘Settings’
- Acquire the lock
- In the ‘Designs’ section, under ‘System Defined Frontend Design’, use Override’ to select the design created earlier
- Apply the changes.
Step 4: Test!
The sitemap.xml should now load using the address of www.yourdomain.com/sitemap.xml
You should now open it and check if it is including everything you need, and make sure it’s not including stuff you dont want – such as folders that you dont want Google to index.
You can go back to the asset listing details page to customise what is and is not included.
